I thought I'd give you guys a look into my recent estate sale hunts. Found some pretty good things and came to a realization. I have a lamp fetish. I'm collecting too many of them and although I hate to do this to you, I feel it's appropriate to quote Anchorman. Yes, I do love lamp.
Silver arc lamp. The cord was broken and the guy asked $40. I told him I couldn't pay over $25. He said, "ok!" Doesn't hurt to ask! Rewired it and it's purrfect! The rewiring task proved to be a bit intimidating, so it sat in my trunk for about 6 months, but now it's purrfect! ;)
Basket weave hanging lamp. Asked $20. I told her I'd like to pay $10. It was their last day of the sale. She said she couldn't do it. So, I left. She chased me down the hall and said she'd take $10. ;) I may paint this lamp later. I haven't decided what color yet. Possibly white... Or yellow...
Gold finish coffee set. Asked $12. I said, "ok!"
Like I've said before, it's important to note what the items are worth to you. Many times people at these sales are greedy and won't budge on the prices. It's ok to walk away. I'd rather leave empty-handed than leave with something I overpaid for. Sometimes, the walking away gets you the item anyway!
Love,
Kelly
Saturday, January 19, 2013
Wednesday, January 16, 2013
Slow Cooker Chicken Fajitas...sort of
So once again I am trying to eat healthy and actually do that whole working out thing. Which I hate, so we'll see how this goes. But with that being said I have been on a healthy recipe search and in my quest came across this little gem: Slow Cooker Chicken, which I figured would be really good in fajitas, or tacos, or something of the like. Plus the recipe sounded super easy. I love slow cooker meals...throw shit in a pot and let it sit all day, come home and dinner's ready..BAM! What more could you ask for?
Here's what you need:
2 pounds (32 ounces) chicken breasts, boneless and skinless
1 cup salsa, homemade or purchased
1 cup petite diced canned tomatoes (choose low-sodium)
2 tablespoons taco seasoning
1 cup onions, diced fine
1/2 cup celery diced fine
1/2 cup carrots, diced
3 tablespoons sour cream, reduced fat
1 cup salsa, homemade or purchased
1 cup petite diced canned tomatoes (choose low-sodium)
2 tablespoons taco seasoning
1 cup onions, diced fine
1/2 cup celery diced fine
1/2 cup carrots, diced
3 tablespoons sour cream, reduced fat
2 bell peppers (I chose red and yellow, primarily because they were on sale and I'm cheap)
1 cup shredded lettuce
1 cup shredded cheese (choose whatever kind of cheese you like here)
8 flour tortillas
recipe yield: 8 servings (supposedly, seems to be a lot more than that to me though)
Hhhokay, so, first chop the carrots, celery and onions. I know the ingredients say diced, but I went with more of a rough chop and it was fine, but I am impatient and hate dicing things. So it's totally up to you on the size here.
Your chicken is probably close to good to go, but make sure that you rinse it with water first. I also like to trim up the edges a bit as well...get off that extra skin and random hangy parts that tend to be left on boneless, skinless chicken breast. Again, that's a personal preference thing, so you could just use them as they come out of the package.
Place the chicken in the slow cooker...I ended up with two layers of chicken so I layered the other ingredients between the chicken layers. Then add the taco seasoning, onion, celery, carrots, salsa and 1/2 a cup water.
Set the cooker on low, cover it, and let it cook for 6-8 hours. The meat is cooked when it shreds, or when it reaches an internal temperature of 165°F. I turned mine on before I went to work, and by the time I came home the chicken literally fell apart as I was taking it out of the cooker...which is what you want. Take the chicken out and shred it. When you finish you can put it back in the leftover sauce that is in the cooker, and it will stay warm while you prepare the rest.
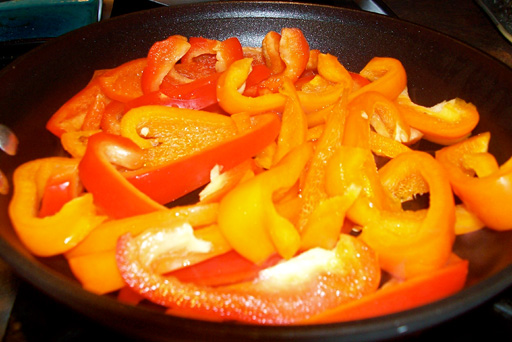
Cut the peppers into strips and place in a medium sauce pan. Cook on medium heat until the peppers begin to char a little (or until your desired level of cookedness, yes that's a word, because I say it is). Stirring occasionally. While the peppers are cooking, warm the tortillas either in the microwave for about a minute or in the toaster oven. Also if your lettuce is not shredded already, you can do this now.
Once peppers are cooked assemble the fajitas to your liking. I did chicken, cheese, peppers, lettuce and a little sour cream. These were very tasty, super easy and we had a TON of leftovers, which means no cooking for the next couple of days (always a bonus). I will definitely make these again but probably cut down the recipe a little. So go on, give these a try and let me know what you think!
~Jessica
Friday, January 11, 2013
EASY: How to turn King Pillowcases into Standard
I've carted these great pillowcases with me from apartment to house to apartment for years. I can't remember when I got them... probably when I was a teenager at a garage sale with my mom. They are obviously from the 60s, I'd say. Unfortunately, they were king sized. So, the other day I decided it was time to get new pillows. I was faced with the question of getting standard or king pillows, to fit my rediscovered cases. King pillows would not fit on my full sized bed though, so standard it is! Therefore, a compromise had to be made..
Solution! Turn king cases into standard!
1. Turn pillow case inside out
2. Measure 5" from seam
3. Sew vertically along the 5" mark
4. Turn pillowcase inside out
Cute, huh? AND now I can buy more random, mis-matched cases at estate sales because I know how to fix 'em :)
Love,
Kelly
Solution! Turn king cases into standard!
1. Turn pillow case inside out
2. Measure 5" from seam
3. Sew vertically along the 5" mark
4. Turn pillowcase inside out
Cute, huh? AND now I can buy more random, mis-matched cases at estate sales because I know how to fix 'em :)
Love,
Kelly
Wednesday, January 9, 2013
Designer Arsenal: How to Make a Box
This is the beginning of a new feature I will be doing on occassion. I plan to talk about some things that every designer should know and have in their arsenal, if you will. Starting with tonight's post, where we will learn how to make a box. Why do I need to know how to make a box, you say? Why DON'T you need to know how to make a box? For designers in particular it is an excellent skill to be able to physically mock up products. Yes, we live in a digital age, and you COULD do it in Photoshop, but come on...everyone knows it's Photoshopped. Plus I firmly believe that it is just nice to have something physical to look at and hold. For those of you who are not designers, a box can come in handy for all kinds of crafts, so bear with me here.
What you'll need:
1. Poster board (once you get this down you can use a thicker chip board for more durability)
2. Exacto Knife
3. Ruler
4. Pen/Pencil/Writing instrument of some kind
5. Cutting board
6. Bone Folder (Scorer, whatever you want to call it)
7. Double Stick Tape (I know, I know...I have glue pictured but that was before I remembered that glue sucks and double stick tape is the shit and I'm lazy and didn't want to retake the pic. I know some people don't like it, but I love it, let's put that shit on everything...but I digress)
What you'll need:
1. Poster board (once you get this down you can use a thicker chip board for more durability)
2. Exacto Knife
3. Ruler
4. Pen/Pencil/Writing instrument of some kind
5. Cutting board
6. Bone Folder (Scorer, whatever you want to call it)
7. Double Stick Tape (I know, I know...I have glue pictured but that was before I remembered that glue sucks and double stick tape is the shit and I'm lazy and didn't want to retake the pic. I know some people don't like it, but I love it, let's put that shit on everything...but I digress)
This here is your handy dandy diagram of how to cut this out. I did a 5x5 box, so you will want six 5x5 boxes altogether. Leave a 1/2 inch tab on the 5 outermost boxes. It's really hard to explain, but basically draw the diagram above on your poster board.
Now the tricky part. Using your Exacto and ruler cut out your box, but make sure to just cut the outermost lines. The rectangles that were made for tabs will also need to be cut in the inner corner so that they can fold in. Again, reference diagram. When cut out, it should look something like this:
Then using your bone folder and ruler, score all the areas that will be folded. Scoring just makes it easier to fold and makes sure that you have a straight line.
Once scored, apply double stick tape to the tabs on the box. Stick the tabs to the inside of the side kitty corner to it. It's pretty self explanatory once you get to this point...you're making a box, soooo make it look like a box. Try to align the edges as best as possible, the box will work best if everything is even.
Fold the top down, but do not tape that side or else you just have a cube, not a box. But that's it! Once you get this down you can move on to more advanced boxes and shapes. If you are using this for a mock up, you would then print out your design, preferably in the same shape as the the diagram and wrap that around it. Sorry I'm not great at explaining what to do, but it's not too tough if you have the correct shape to cut out. Try it! Lemme know how it worked!
~Jessica
Saturday, January 5, 2013
DIY Jewelry Holder
I was strolling through Home Depot and saw these awesome peg boards for tools. The brand is Everbilt. I have been needing a jewelry holder for a while now. These came with all different types of hooks and there was also a basket pack with three sizes. I hate jewelry holders that take up dresser space, so a wall option is best for me. These were originally black, but per usual, I spray painted them. I used the colors leftover from my folding chair project. The spray paint dried really fast when left outside in the freezing cold. BTW this looks fucking cute. >^^<
Love,
Kelly
Subscribe to:
Posts (Atom)

.jpeg)
.jpeg)