Sunday, September 22, 2013

Make your own pop art!

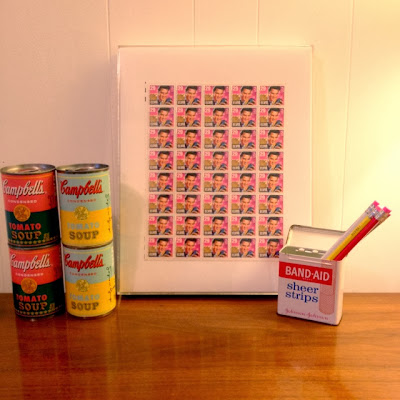
Etsy is mostly known for its' online access to handmade crafts and shops. Have you tried looking for vintage items on there though? It's my favorite resource for handpicked vintage finds, like these 1993 Elvis stamps I recently got. They arrived in a wooden frame, but it wasn't quite what I had in mind. I wanted a way to display my collectable stamps in a tasteful way, not nerdfully stashed away in a scrapbook. By the way, I wish I understood my obsession with stamps. It's really boring.


So, I looked around to see what I had to use...and found a couple frames I recently picked up at Goodwill. I popped the stamps in the boxed plastic frame and holy shit, it looked awesome. The repetition of the Elvis faces channelled Warhol's Marilyn prints. Encased in the acrylic frame, the look became very modern.


What I'm trying to say here is if you want some cheap pop art, you can make it yourself with some stamps and a modern frame. :)

Love,
Kelly

Friday, July 26, 2013

Make a potted herb plant as a quick hostess gift!

Here's an idea. Instead of buying a last minute bottle of wine to take to a party you've been invited to, how about potting a plant for them? I know it sounds time-consuming and daunting, but you can pot a bulk amount of plants and take some as you go! I mean, summer is the time to do it when there is so much going on. I got the idea from my dad a few weeks ago when I was home in Michigan. He bought a flat of different basil varieties (lemon, etc.) from his local nursery and some simple pots from the dollar store. Obviously, you don't have to use them right away. You can care for them yourself until the party day.

Make sure you soak the seedlings in water before planting them so they are quenched and ready to go! He mixed half fertilizer with half potting soil. Don't be scared if the fertilizer bag says "manure" on it; it doesn't smell like manure. You should probably wash your hands after handling it though, to be safe. :P I added images of the mixes my dad used below. He also added mulch to the top for not only a more finished look, but also because it helps hold moisture in the plant. See apartmenttherapy.com's creative ideas for mulch.


I hope you try it!

Love,
Kelly

Tuesday, July 23, 2013

Who drinks tea anymore?

I have too many tea towels. I don't even drink that much tea. I bought this tea towel in London along with a pair of underpants that say "Mind the Gap." I have displayed this towel in my apartment on my bar cart, but thought it time to give it a home to preserve it. I placed it in an Ikea frame I had leftover from a previous trip. Since the towel was white, you could see through it, so I used a sheet of acrylic paper to make it look more pure.


London Tube map tea towel


Pretty Boy
Thanks for reading and congrats to the new royal baby boy :)

Love and cheers!
Kelly

Wednesday, July 3, 2013

Fourth of July Shirt

Hey, it's the 4th of July (well almost) let's make a shirt!

So in full disclosure, I did not go in to making this shirt with the intentions of it being a Fourth of July shirt, but it happened that way, so we're going with it.

(I apologize in advance for the blueness of all these pics, wasn't paying attention to the fact that the carpet is also blue in the sewing room)

What You Need:

1) A Shirt (One that is a little big on you will work best)
2) Ruler
3) Chalk
4) Scissors/Exacto knife
5) Studs (I actually am using star shaped brads)

First, using a ruler draw a straight line with the chalk across the front of the shirt. I made mine right where the V on the neckline exists.

Then, also using a ruler, draw vertical lines from the shoulder seam, down to the horizontal line you drew. I made 10 lines. I wanted 8 strips, so 10 lines.


Cut down all of the vertical lines you just drew. DO NOT yet cut the horizontal line. I used an Exacto for this as it is easier, for me personally, to do that than cut in with scissors. But that is up to you. If you do use an Exacto, make sure to have a cutting mat below, and PLEASE BE CAREFUL. I have seen (and experienced) too many Exacto accidents to not stress that.


Use the Brads, or studs, to connect every other strip you just made. Once you can see which strips you will actually be using, cut out the ones you don't. This part is a little hard to explain, but basically in the end you will only keep every other strip.

Use as many Brads as you like, and connect the strips in whatever pattern you feel like.

Finally cut a slit in the bottom of the shirt along the side. And tie the slit on the side.


That's it! I may pair this with a red tank underneath just to make it extra patriotic.

~Jessica


Thursday, June 20, 2013

Lace Shorts

It's summer! Yay! Hence a lot of not posting here on the blog. Oh well, you should be outside enjoying the weather anyway.

But since it's summer (or tomorrow is, but let's not get picky), that means it's shorts season. I actually am not a huge fan of shorts and tend to lean more towards the skirt/dress option. But if I do decide to wear them, I dont want them riding up and pinching my legs and being super uncomfortable. So one solution I recently found to fix shorts that are a little too snug in the thigh region, is to add a bit of lace to them.


Here's what you need:

A pair of shorts (mine are actually cutoffs as well, but any pair of shorts is fine)
Scissors
Lace (2 pieces, about 6 inches wide and 8 inches long)
Pins
A sewing machine (you could hand sew this if you do not have a sewing machine, but the machine is easier)


First, cut a triangular piece of fabric off the outside part of your shorts. Do for both legs.

Then measure out how much lace you need to fill the gap in your shorts with the lace.


Place the lace on the inside of the shorts and pin in place. Then simply sew the lace in place. When you are done you can trim any excess lace from the inside or hanging off the bottom.


That's it! Pretty easy and pretty cute, better fitting shorts in the end.

~Jessica