Friday, October 26, 2012

Soak Up Some Fall


With the strong gusts of wind we had here in Michigan today, I believe the last of our fall leaves have hit the ground. And with them the gorgeous fall colors. With that being said, I wanted to share some pictures I took a couple weeks back, and enjoy the wonderful colors the fall brought us.


Til next time!

~Jessica


Friday, October 19, 2012

Pumpkin Ravioli


Are you ready for some pumpkin amazingness? I hope so. I recently found a recipe for pumpkin ravioli, via Eat Yourself Skinny.   

And seeing how I LOVE pumpkin, I just had to try it.

Here’s what you’ll need:


For the pasta dough:
5 eggs
1 tablespoon olive oil
1 tablespoon salt
3 cups all purpose flour

For the filling:
1 8oz can pumpkin (not the pie filling, just plain pumpkin)
1 cup ricotta (the recipe I followed used pecorino, but I could not find that at my local Kroger, and ricotta works just fine)
2 teaspoons nutmeg
1 teaspoon cinnamon
Dash salt and pepper

For the “sauce”:
3 tablespoons butter
Fresh rosemary and thyme (I used roughly a tablespoon of both)

(Recipe yields enough for six)

Alright, ready? Here we go!

Combine the eggs, olive oil and salt in a small bowl. In a large bowl place the flour, then add your egg mixture.  Use a fork to combine mixture with flour until it forms a sticky ball. Note: I actually had to add a little bit of water to my mixture, as it was too dry to form a ball. I added roughly 2 tablespoons of water, but if this happens to you, just slowly add water until it starts to form said ball (you don’t want to add too much water, just enough to make it stick).

Once ball is formed, flour your hands a little bit and divide dough into 3 sections. Knead each ball a little, then put in separate bowls, cover with plastic wrap and refrigerate for a couple of hours. You will want to make sure that your dough has enough time to chill as it is much easier to work with it chilled, than warm.

In the meantime, make the pumpkin mixture. Put the pumpkin, ricotta cheese, nutmeg, cinnamon and salt and pepper in a bowl and mix well. Refrigerate until ready to use.

Once the dough has chilled, roll it out on a floured surface. Try to get the dough as thin as possible, without it tearing.  I definitely could have rolled mine out thinner, as the raviolis themselves ended up being a bit thick in the end, so the thinner the better!

After it s rolled out, cut the dough into small squares. I found that 2x2 inch squares worked fairly well. Place a dollop (approx. 1.5 teaspoons worth, but will vary on your square size) of the pumpkin mixture in the center of a square then place another square on top. Take a fork and press the edges together. Be careful to not puncture the dough, but also make sure all the edges are sealed completely (otherwise water will get inside your ravioli, and it will probably explode when it is boiled).

Just a dollop

Aren't they cute?

Continue this until all your pumpkin mixture (or dough) has been used.


Boil well salted water. Once water is boiling, carefully drop in the raviolis. I found that doing a couple at a time worked best. They will probably stick to the bottom; so after they have been in for about a minute use a spoon to nudge them off the bottom. Allow them to stay in the water until they float (about 3-4 minutes). Carefully scoop them out and place them in a colander to rid of excess water.

Melt the butter. Just before it starts to brown, add the rosemary and thyme and allow it to brown slightly. Pour over the raviolis.

Step back and admire your work, then dig in! Try not to eat the whole plate, as you will want to, but enjoy!


This is seriously an amazing recipe, and won over even my dad, who was not at all excited that I was making this (it sounded really weird to him) but in the end decided this was a fall recipe to remember, and I couldn’t agree more!

~Jessica

Thursday, October 18, 2012

Favorite Kitsch Film Interiors

I find the greatest inspiration for interior design through movies, like many. Especially when the set acts as a character itself, such as the movies below. If you know me, you know that my sole criteria for enjoying a film is that it is pretty. I am that vapid and uninteresting.


Stanley Kubrick's A Clockwork Orange
                                          Production Design by John Barry                                                                                                                                


Stanley Kubrick's The Shining
Production Design by Roy Walker      


^^ I wish I could find a better image for this scene...It's so amazing!
C'mon. It's beautiful.

Tom Ford's A Single Man
Production Design by Dan Bishop


Speaks for itself!

Sofia Coppolla's Marie Antoinette
Production Design by K.K. Barrett


Now, the Victorian style is not really my thing...but I can't help but be inspired by it for that reason. I am not a fan of blue, but somehow this dated, mundane blue is very interesting to me..not something I would think of. It's funny how a tired look can suddenly become new and fresh again when used in the right way.

Wes Anderson's The Royal Tenenbaums
Production Design by David Wasco


This movie interior seems like it is right out of 2012. The large prints and traditional portraits among modern  decor is very current IMO. I love the whole Floridian, mid-century kitsch thing he has going on.

Love, 
Kelly


Follow my blog with Bloglovin

Thursday, October 11, 2012

This is Halloween

Tis the season for costumes, candy and general ghoulishness! That is to say it is October, and therefore one of my favorite months, because (drumroll please) Halloween is here! I wish it could be October all year long, I kid you not. Anyway because of this (and an idea brought up by my fellow blogger Miss Amanda) I decided to make some fun Halloween prints to help all of you get just as excited as me about Halloween. These are all downloadable (and free) so just click your favs and they are yours for the taking! Enjoy!


Now go out, get some cider and doughnuts, and embrace the wonderful season that is upon us!

~Jessica

Follow my blog with Bloglovin

Wednesday, October 10, 2012

PUMPKIN ROLL


This recipe is the only food that I cook every year and still can't wait to eat.
Right away.
While I'm making it.
It took so much will power not to ingest the ingredients.
Separately.
In their packaging.

Dry Ingredients:
3/4 c. flower
1/2 tsp. baking powder
1/2 tsp. baking pop (we are from Michigan- helloo)
1/2 tsp. cinnamon 
1/2 tsp. cloves (or nutmeg, which I used...who keeps cloves around?? good for you if you do.. you are on top of things!)
1/4 tsp. salt

Mix dry ingredients together in a large bowl.

Wet Ingredients:
3 free range eggs :)
1 c. granulated sugar
2/3 c. PUMPKIN
Beat sugar and wet ingredients together until sugar is dissolved in a smaller bowl.
Slowly pour wet ingredient into dry ingredients. Beat until smooth.


TRICK: liberally grease the pan. I used a non-stick pan AND cooking spray. You do not want the cake  to stick to the pan! You can also use wax paper if you're paranoid.

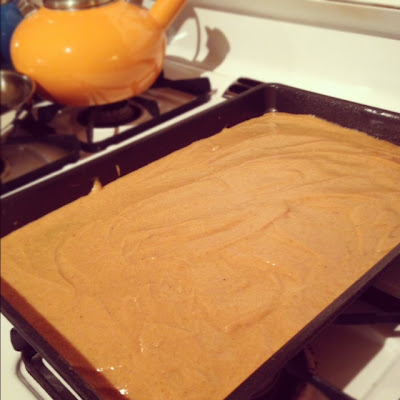
Pour batter into shallow 13x9 jelly roll pan. It will seem like there is not enough batter, but try your best to spread it evenly. Preheat oven to 375 degrees.

I FUCKING love this picture.


Liberally sprinkle powdered sugar over a thin, clean towel a little bigger than the size of the pan. Bake for 12-15 minutes or until it springs back when you touch it. Immediately turn the pan upside down onto the sugared towel. The pan will be hot, so while wearing an oven mitt, pound the bottom of the pan to release the cake. If you greased the pan enough, the cake should come out easily. 
Sprinkle powdered sugar over the top.

Roll the cake with the towel very tightly.

Cream Cheese Filling:
1 package of cream cheese
6 tbsp. salted butter or margarine, softened
1 c. powdered sugar
1 tsp. vanilla extract

Let the pumpkin roll cool.  Beat cream cheese filling ingredients together until smooth. Then, carefully unroll the cooled cake and spread the cream cheese filling. Try not to put too much near the edges of the roll or it will ooze out. Tightly roll the cake again and refrigerate for at least 3 hours before serving.

TRICK: When serving, run the BREAD knife under hot water every couple slices to make clean, even cuts so the swirls look their best 
I make this recipe every year around this time and take it to any holiday dinner I am invited to. It's a crowd pleaser and a me pleaser. I also will often make about 3 rolls at a time and freeze a couple. You can cut it in half for a small gathering or take the whole one for a big feast.

 Comment if you've tried my pumpkin roll, please!

 Happy Pumpkin Season >^^<

Love,
Kelly


Follow my blog with Bloglovin

Friday, October 5, 2012

Chalk it Up


I've been obsessed with chalkboard paint ever since I knew such a thing existed. Why? Why not? It's awesome-you can make anything into a chalkboard. A canvas that you can use and reuse on a daily basis, what's not amazing about that? So when I learned that there was a chalkboard paint you could use on ceramic, I knew I had to try it.

Here's what you'll need:

1. A mug (blank or not, doesn't matter)
2. Ceramic chalkboard paint (I used Pebeo Porcelaine 150 Chalkboard Paint and found it at Amazon, but you can also find it at Dick Blick)
3. Painter's tape
4. A paint brush
5. Chalk


First find a mug you want to use. You can easily go to a thrift store and find blank mugs, but seeing as how I work for a company that prints mugs and therefore has an excessive amount of waste in that area, I could not justify actually buying a mug. So I took one of these reject mugs and decided I would paint over the existing graphic.


Tape off the area you want to paint. I used regular old blue painter's tape and it worked just fine. Taping off the mug will allow you to have clean lines, but by all means, you do not have to do this. 

Use a thick bristle brush and paint the area you want painted. I suggest laying it on kind of thick, like more thick than you're probably comfortable with. It works better to do it this way and then you wont have to do multiple coats (but if you need to do more than one coat, allow each coat to thoroughly dry before painting the next one). If you mess up you can easily wipe off what you don't want with a wet cloth or paper towel.

After you're finished painting, peel off the tape. I suggest doing this right away, I waited with one and it ended up peeling off some of the paint as well.


Allow your mug to dry for 24 hours. Then bake it at 300 degrees for 35 minutes. It is important that you put the mug in as the oven preheats, then let it sit in the oven as it cools back down. This decreases the risk of the mug breaking.

Once your mug has cooled, slate the chalkboard area. This simply means, lightly run chalk over the entire surface and then gently wipe away.

Now your mug is ready to draw on! Have at it!


Super fun, right? And bonus, once it's baked it is dishwasher and microwave safe, even better.

Til next time!

~Jessica